Chapter 5 R and RStudio
Learning outcomes At the end of this chapter you will be able to install R and R Studio as your integrated work environment for data processing and visualization.
Before going forward with the analysis of genomic data, I would advise you to do one more step. You see... Your overall goal is to make sense of your genomic data by computing certain statistics (depending on the goal of the study) and visualize the results. Now, PLINK can compute many things, but surely not everything. So you probably need something else in addition. Also, PLINK lacks any visualization capacities, so you surely need something else for the visuals.
Here, my advice is to find an integrated work environment that could do both computation and visualization for a wide range of analyses. Of course, you can venture out to the World Wide Web, and/or ask your colleagues for their recommendations. Your final choice could depend on your previous experiences, or those of your colleagues and friends, or even the routines at your workplace. With this choice, there is no "one size fits all" solution.
My recommendation is to use the R programming language. It is easy to use even for beginners, it is freely available, with a lot of packages for an extremely diverse range of methodologies. In addition, it could be used as a universal environment to run all your code (including PLINK), so you do not need to copy-paste commands, move around files, or other such error-prone shenanigans.
In the following part of this chapter, you will see how to install the R work environment (four easy steps), briefly discuss how said R work environment looks like. An example of use is demonstrated in the Your first PLINK tutorial chapter that shows how to run PLINK from R.
5.1 Getting R and R Studio
The R programming language comes along in a program that should be downloaded and installed on your computer. To be very honest here, the native form does not look so nice. It is essentially a command-line interface that might not be friendly to beginner users (read: it is not beginner-friendly at all). With time, you will get used to it, but if you are at a stage figuring out what a "working directory" is, you probably appreciate all the visual help and aid you can get.
The R studio is a huge improvement in this regard. It provides clickable insight to data, shows your script, work environment, graphs, and help files, all on one screen. It is the work environment you use to make your life easier.
So how to get these two beauties:
Go to the R Project website and click the Download link on top of the left pane. After choosing a preferred mirror site, proceed to download the R for your operating system, Windows, Mac, or Linux.
Install R from the downloaded file. You will be asked a bunch of questions during the process, but you are fine to click just "Next" all the time.
Go to the R Studio website and download the program. You will see that there are paid versions as well, but the free version will be more than enough for you. I am using this for many years now.
Install R Studio from the downloaded file. Again, the default settings should be good to go.
5.2 How to use R Studio
After opening R Studio, you will see a similar layout as shown in the picture below.
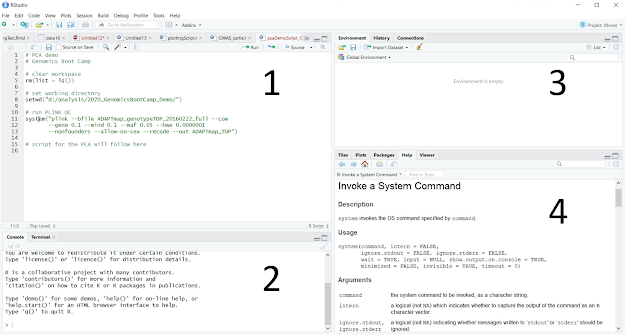
Figure 5.1: The layout of R Studio: 1. Script editor; 2. R console; 3. Environment; 4. Help and graphs
The program itself can do a lot of things, but for now, you are fine to know about the main parts. For your convenience, I numbered them and will explain them briefly.
The part on the top left is the script editor that has an integrated syntax-highlighting feature. This means that comment lines, function names, and similar are distinguished with different colors. Moreover, you can run the script directly from here, so no copy-pasting is required. As you see, you can have multiple tabs opened at the same time as well. At a fresh install this part may not be visible, so just click File > New File > R Script to get to this stage.
On the bottom left is the R console itself. This is the actual R that you have installed previously. Here you can also see how your script performs, or if there are any warning or error messages to take care of.
On the top right there are multiple tabs. The most important one is the "Environment", which will show any data and variables you will work with. The data sets are also clickable, so if you want to see them, just click and these will be displayed in the top left part.
On the bottom right there are also multiple tabs. Two of them are of particular interest. The first one being the "Help" tab, which is also displayed in the picture. You see... All R functions come with a help file, which you need to consult if you want to run any kind of analysis. The other tab of interest is "Plots", which will show you any visualizations you have created during your work.
5.3 Excercise
The exercise for this topic will be about the exploration of what R can do. The short answer: (almost) everything. Long answer: There is a lot of books and other resources written about it.
From the data analysis and visualization perspective, one of the options is to use the so-called tidyverse packages. This part of R is still relatively new and constantly developing. Still, if you are new to R, or you have experience "just" with the base R, I warmly recommend checking it out.
So what you need to do:
Install tidyverse. We did not go into details about package installation, but I firmly believe you can do it! Also, there is help all around.
Check out the R for Data Science book, available for free, online. This is not about genomics, but rather on the use of R and tidyverse for data visualization and modification. There are also notes on the tidyverse installation there (chapter 3.1.1).
As always, you are encouraged to check out the YouTube video (below) to compare your solutions with me and for some bonus material on the topic.
If the embedded video does not start, click it again to "Watch on YouTube". Direct link: https://www.youtube.com/watch?v=nKLqqkWWyA0